NOTE: This article requires you to already know what convolution in image processing is.
NOTE: Check out this repo which features the assets mentioned in this blog post.
Convolution, being the most essential and useful technique in image processing, can create a range of effects, such as Gaussian blur, edge detection, sharpening, and so on.
The most standard implementation of a multi-pass convolution effect is by using custom render features. (well, essentially, the convolution is still implemented inside a shader). But here I would like to take a step further, to see if it is possible to do something similar as what I did with the Kawase blur effect - limiting the effect to a certain zone instead of a global post processing that covers the whole screen, and can be resized with an animation.
And with the help of Custom Render Texture, it has been done and is very modular.
Implementation Detail
First, a custom render texture, just like render texture, can hold the result of a convolution operation and be fed to another as input. The documentation states that by setting a custom render texture as the initial texture of another, Unity will handle the update order. With this in mind, what left to do will be to create a custom render texture for each pass and assign a convolution operation (material) to each of them.
Implementing convolution is simply sampling the input texture with an offset and then multiply it by a kernel value. For a 3x3 kernel, that means to sample in a tic-tac-toe pattern, and then sum the cells up.
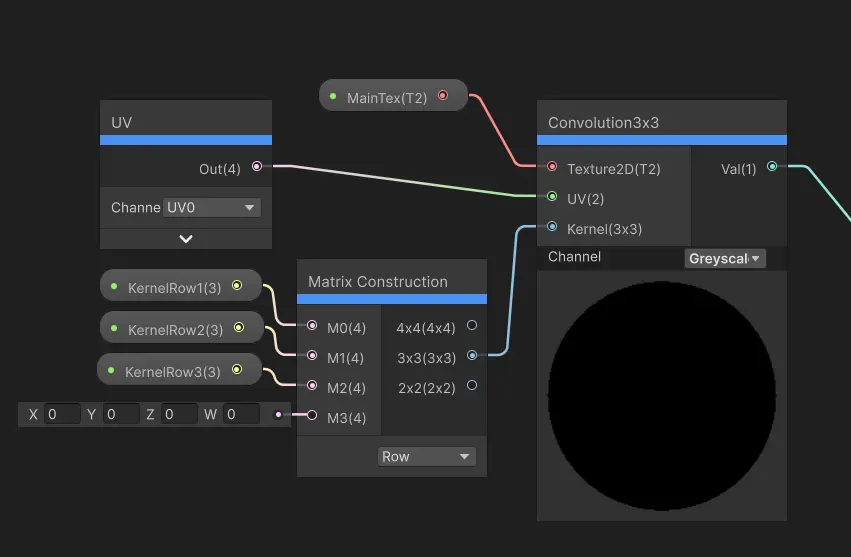
the following image shows the “Convolve Cell” sub-graph, noting that it also expects UV so that you can customize whether to use texture UV0 or screen position.
The channel mask is to select which channel or perceptual grey scale to use when running the convolution.
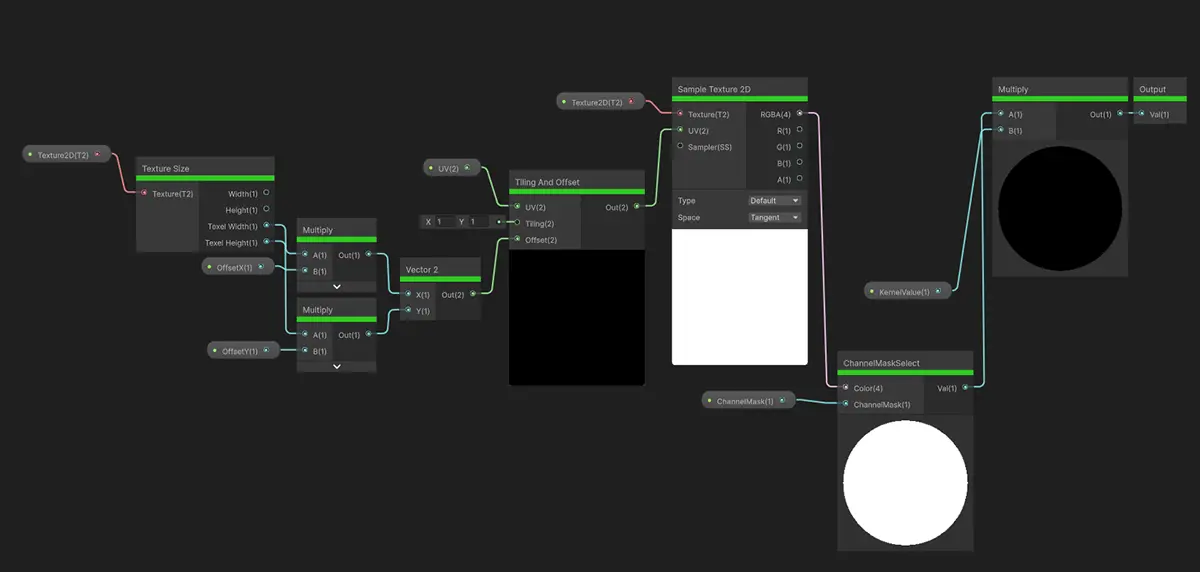
Therefore, it is straightforward to construct a 3x3 convolution node.
And with perhaps a little bit of work, a 5x5 or even 7x7 convolution node. But unfortunately Unity only supports up to Vector4 thus making a proper editor can be potentially demanding.
(Oh, by the way, Matrix3x3 is not available for the inspector, thus I used 3 Vector3 instead)
Support for Custom Render Texture in Shader Graph seems to be a very new thing, because the documentation is still stated that you can only write shader for it with code. But that needs to be updated as you can already find “Custom Render Texture” in the shader graph creation menu.
Well anyway, since we already have the convolution node, it is faster to create a shader for custom render textures. Strangely, I hoped that there is a magic property like _MainTex that automatically binds the custom render texture to that property, but I’ve tried and nothing worked.
Finally, create materials for common kernels, like the one showing on the right.

Extra
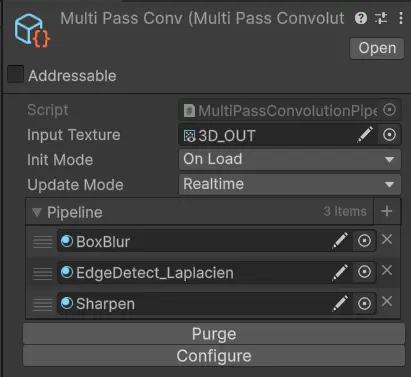
I’ve created a little script that helps to ease the pain of configuring the pipeline. By clicking Configure after setting everything else up, it will automatically create custom render textures, copy the materials, and link them in top-to-bottom order. This is currently written with Odin. The created assets will become sub-assets of the Scriptable Object.
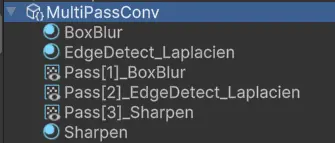
An example of what happens if you click the Configure button. Each Pass N will result from each pass. Fetch the last one to get the final result.
NOTE: For a more code-oriented approach, check out this repo which does the same thing but without the hassle of setting up custom render textures. And honestly, this is the lib I have been using practically.